Navigating the Landscape of the Big East: A Comprehensive Guide to the Conference’s Geography and History

Introduction

With great pleasure, we will explore the intriguing topic related to Navigating the Landscape of the Big East: A Comprehensive Guide to the Conference’s Geography and History. Let’s weave interesting information and offer fresh perspectives to the readers.

Big East Conference  peacecommission.kdsg.gov.ng

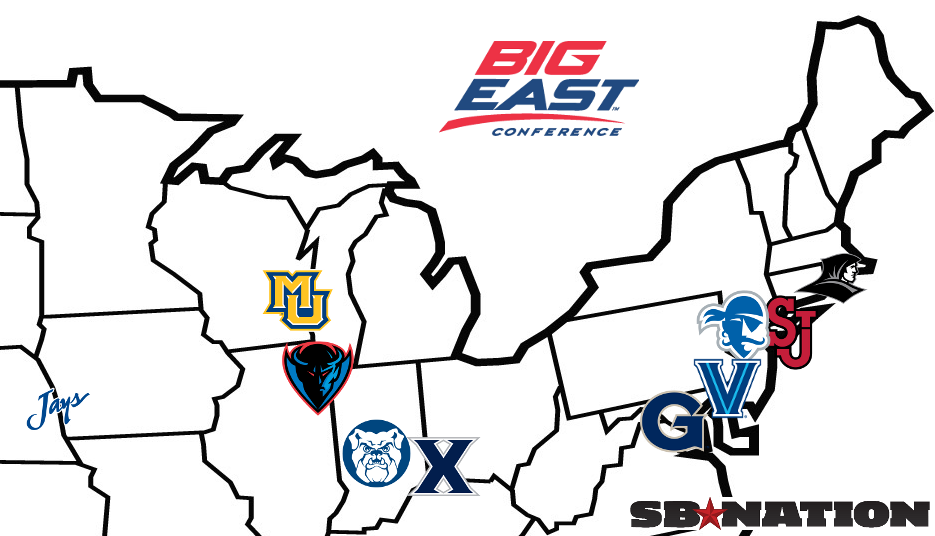
The Big East Conference, a prominent force in collegiate athletics, boasts a diverse membership spanning across the eastern United States. Understanding the geographic distribution of its member institutions is crucial for appreciating the conference’s rich history, competitive landscape, and cultural impact. This guide provides a comprehensive overview of the Big East’s map, exploring its evolution, key regions, and the unique characteristics that define each member institution.

A Historical Perspective: From the Atlantic Coast to the Midwest

The Big East’s origins trace back to 1979, when seven universities from the northeastern United States โ€“ Boston College, Georgetown, Providence, Seton Hall, St. John’s, Syracuse, and Villanova โ€“ sought to establish a new athletic conference that emphasized basketball. This founding group was joined by Connecticut in 1979 and Pittsburgh in 1982, establishing the core of the conference.

The Big East’s early years were marked by its strong emphasis on basketball, with the conference consistently producing national champions and attracting widespread attention. However, the conference’s geographic reach expanded in the 1990s, with the addition of several institutions from the Midwest: DePaul, Notre Dame, Rutgers, and Miami (FL). This expansion broadened the conference’s athletic footprint, but also contributed to internal tensions as the conference’s focus shifted towards football.

The Big East’s Shifting Landscape: Realignment and the Rise of the "New Big East"

The early 2000s saw a period of significant realignment in college athletics, with the Big East experiencing a major shakeup. In 2004, Miami, Virginia Tech, and Boston College left the conference to join the Atlantic Coast Conference (ACC), while Notre Dame joined the ACC in all sports except football. The departure of these institutions led to the formation of a "new" Big East, composed of the remaining original members, along with several new additions: Cincinnati, Louisville, Marquette, South Florida, and West Virginia.

The "new" Big East, while retaining a strong basketball tradition, embraced a more balanced athletic approach, emphasizing both football and basketball. The conference’s geographic reach also expanded, stretching from the Northeast to the Midwest, encompassing cities like New York City, Philadelphia, Chicago, and Pittsburgh.

Exploring the Big East’s Regions: A Geographic Overview

The Big East’s map can be divided into several key regions, each with its distinct characteristics and contributions to the conference’s identity:

  • Northeast: This region, anchored by the original Big East members, remains the heart of the conference’s basketball tradition. Boston College, Georgetown, Providence, Seton Hall, St. John’s, and Villanova all boast storied basketball programs, having consistently produced top-ranked teams and individual stars. The region also features a strong academic focus, with institutions like Georgetown and Boston College recognized for their academic excellence.

  • Midwest: The addition of institutions like DePaul, Marquette, and Cincinnati brought a distinct Midwestern flair to the Big East. These universities, located in cities like Chicago, Milwaukee, and Cincinnati, bring a diverse cultural perspective to the conference, while also contributing to the conference’s growing football presence.

  • Southeast: The Big East’s presence in the Southeast is relatively recent, with the addition of South Florida in 2005. This institution, located in Tampa, Florida, provides a unique geographic and cultural dimension to the conference, offering a blend of academic and athletic excellence.

The Big East’s Impact: A Legacy of Competition and Cultural Exchange

The Big East’s geographic reach and diverse membership have played a significant role in shaping its identity and legacy. The conference’s geographic distribution fosters a vibrant exchange of ideas, perspectives, and traditions, contributing to a rich and diverse cultural landscape.

The Big East’s strong academic focus is evident in its member institutions, which consistently rank among the top universities in the nation. This commitment to academic excellence is reflected in the conference’s strong emphasis on student-athletes’ academic success.

The Big East’s competitive spirit is equally renowned, with its member institutions consistently vying for national championships in a wide range of sports. This competitive spirit is fueled by the conference’s geographic diversity, which fosters a sense of rivalry and a desire to excel.

FAQ: Understanding the Big East’s Geography

Q: What is the largest city represented by the Big East Conference?

A: New York City is the largest city represented by the Big East, with St. John’s University and Fordham University both located within its borders.

Q: Which Big East institution is located furthest west?

A: DePaul University, located in Chicago, Illinois, is the Big East institution located furthest west.

Q: What is the most geographically diverse region represented by the Big East?

A: The Northeast region, with its diverse range of urban and suburban environments, is arguably the most geographically diverse region represented by the Big East.

Q: How has the Big East’s geographic makeup evolved over time?

A: The Big East’s geographic makeup has evolved significantly since its inception, expanding from its original Northeastern focus to encompass institutions in the Midwest and Southeast.

Tips for Navigating the Big East’s Map

  • Utilize online resources: Online maps and interactive tools can provide a comprehensive overview of the Big East’s member institutions, their locations, and their geographic distribution.
  • Explore the conference website: The Big East’s official website offers detailed information about each member institution, including its location, campus, and athletic facilities.
  • Follow the conference on social media: Social media platforms like Twitter and Facebook provide updates on conference events, including travel schedules and game locations.

Conclusion

The Big East Conference’s map is a testament to its evolving identity and its commitment to athletic excellence. The conference’s diverse membership, spanning across the eastern United States, fosters a rich cultural exchange and a dynamic competitive landscape. By understanding the geographic distribution of its member institutions, one can gain a deeper appreciation for the Big East’s history, its present, and its future. As the conference continues to evolve, its map will undoubtedly continue to reflect its commitment to athletic excellence and its commitment to fostering a vibrant and diverse community.

Big East Conference (1979โ€“2013) - Wikiwand Big East Conference  peacecommission.kdsg.gov.ng Big East Conference Logo and symbol, meaning, history, PNG, brand
PPT - Navigating the CBD Balm UK Landscape_ A Comprehensive Guide Navigating The Modern Landscape: A Comprehensive Guide To Operational Big East Conference Map
PPT - Navigating the Landscape_ A Comprehensive Guide to Small Business PPT - Navigating the CRM Landscape_ A Comprehensive Guide to Microsoft

Closure

Thus, we hope this article has provided valuable insights into Navigating the Landscape of the Big East: A Comprehensive Guide to the Conference’s Geography and History. We thank you for taking the time to read this article. See you in our next article!

Navigating the World of RWU: A Comprehensive Guide to Understanding and Utilizing Resource-Based Work Units

Introduction

With great pleasure, we will explore the intriguing topic related to Navigating the World of RWU: A Comprehensive Guide to Understanding and Utilizing Resource-Based Work Units. Let’s weave interesting information and offer fresh perspectives to the readers.

An Introduction to Resource-Based View Method with Templates

The concept of Resource-Based Work Units (RWU) has emerged as a powerful tool for organizations seeking to optimize resource allocation, enhance project management, and improve operational efficiency. This guide delves into the intricacies of RWU, exploring its definition, applications, benefits, and practical implementation.

Defining the Resource-Based Work Unit (RWU)

A Resource-Based Work Unit (RWU) represents a standardized unit of work that is defined by the resources required to complete it, rather than by traditional time-based measures like hours or days. This approach shifts the focus from the duration of a task to the actual resources consumed, providing a more accurate and holistic view of project progress and resource utilization.

The Advantages of Embracing the RWU Framework

Employing RWUs offers a multitude of advantages, enabling organizations to:

  • Improve Resource Allocation: By focusing on resource consumption, RWUs empower organizations to allocate resources more effectively, ensuring that the right resources are assigned to the right tasks at the right time. This eliminates the potential for resource over-allocation or under-allocation, leading to optimized resource utilization.
  • Enhance Project Management: RWUs provide a clear and concise framework for project planning and execution. By breaking down projects into manageable units defined by resource requirements, organizations can track progress more accurately, identify potential bottlenecks early on, and adjust resource allocation as needed.
  • Boost Operational Efficiency: RWUs facilitate better resource management, leading to increased efficiency across all operations. This improved efficiency translates into reduced costs, shorter lead times, and enhanced productivity.
  • Improve Collaboration and Communication: RWUs foster better collaboration and communication within teams by providing a common language and framework for discussing project progress and resource allocation. This shared understanding minimizes misunderstandings and facilitates smoother project execution.
  • Facilitate Data-Driven Decision Making: RWUs generate valuable data on resource consumption, enabling organizations to make informed decisions based on real-time insights. This data can be used to identify areas for improvement, optimize resource allocation, and enhance overall operational efficiency.

Implementing RWUs: A Step-by-Step Guide

Implementing RWUs requires a structured approach that involves defining the specific resources required for each task, establishing clear resource allocation processes, and adopting appropriate tools for tracking and reporting resource consumption.

1. Define the Resources: The first step involves identifying the resources required to complete each task, including personnel, equipment, materials, and other relevant resources. This step requires a thorough understanding of the project scope and the specific skills and resources needed to achieve the desired outcome.

2. Establish Resource Allocation Processes: Once the required resources are identified, organizations must establish clear processes for allocating these resources to specific tasks. These processes should be designed to ensure that the right resources are assigned to the right tasks at the right time, maximizing resource utilization and minimizing potential bottlenecks.

3. Utilize Tracking and Reporting Tools: To effectively manage RWUs, organizations need to adopt appropriate tools for tracking and reporting resource consumption. These tools can provide real-time insights into resource utilization, identify potential issues, and facilitate data-driven decision making.

4. Continuously Monitor and Improve: Implementing RWUs is an ongoing process that requires continuous monitoring and improvement. Organizations should regularly review their RWU processes, identify areas for optimization, and adjust their approach as needed to ensure that they are maximizing resource utilization and achieving desired outcomes.

RWUs in Action: Real-World Applications

The application of RWUs extends across diverse industries and organizational structures. Here are some key examples:

  • Project Management: In project management, RWUs can be used to break down projects into manageable units, allocate resources effectively, and track progress accurately. This approach enables project managers to better control costs, manage risks, and deliver projects on time and within budget.
  • IT Service Management: RWUs can be employed in IT service management to define the resources required for specific IT services, such as software development, network maintenance, or cybersecurity. This allows organizations to allocate resources effectively, optimize service delivery, and ensure that IT services are provided efficiently and cost-effectively.
  • Manufacturing and Production: In manufacturing and production environments, RWUs can be utilized to track the resources consumed in producing specific products or components. This data can be used to optimize production processes, reduce waste, and improve overall efficiency.
  • Human Resources: RWUs can be applied in human resources to manage employee time and allocation, ensuring that the right skills are available for specific projects or tasks. This approach helps organizations optimize workforce utilization, minimize downtime, and enhance overall productivity.

FAQs about Resource-Based Work Units (RWUs)

Q: What are the key differences between RWUs and traditional time-based work units?

A: Traditional time-based work units focus on the duration of a task, measured in hours or days, while RWUs emphasize the resources consumed to complete a task. This shift in perspective provides a more accurate and holistic view of project progress and resource utilization.

Q: How can organizations effectively transition from traditional time-based work units to RWUs?

A: Transitioning to RWUs requires a phased approach that involves defining the specific resources required for each task, establishing clear resource allocation processes, and adopting appropriate tools for tracking and reporting resource consumption. This process should be implemented gradually, allowing organizations to adapt to the new framework and identify potential challenges.

Q: What are the potential challenges associated with implementing RWUs?

A: Implementing RWUs can present challenges, such as resistance to change, difficulty in defining resource requirements accurately, and the need for specialized tools and expertise. Organizations must address these challenges proactively to ensure a successful transition to RWUs.

Tips for Effective RWU Implementation

  • Start Small: Begin by implementing RWUs in specific projects or departments to gain experience and identify potential challenges before scaling the approach across the entire organization.
  • Engage Stakeholders: Involve key stakeholders in the process of defining RWUs and establishing resource allocation processes to ensure buy-in and promote collaboration.
  • Use Technology: Leverage appropriate software and tools for tracking and reporting resource consumption, facilitating data analysis, and optimizing resource allocation.
  • Continuously Monitor and Improve: Regularly review and refine RWU processes to ensure that they remain effective, address emerging challenges, and maximize resource utilization.

Conclusion: The Power of Resource-Based Work Units

RWUs offer a transformative approach to resource management, empowering organizations to optimize resource allocation, enhance project management, and improve operational efficiency. By shifting the focus from time-based measures to resource consumption, RWUs provide a more accurate and holistic view of project progress, resource utilization, and overall organizational performance. Embracing the RWU framework can unlock significant benefits, driving cost savings, improving productivity, and enabling organizations to achieve their strategic objectives.

All You Need to Know About Resource-Based View RWU Family Guide 2023 by rogerwilliamsuniv - Issuu Resource Based View perfectly explained  Helpful Examples.
Improving Resource Efficiency: The Ultimate Guide for 2024  Runn Top 10 Competition View PowerPoint Presentation Templates in 2024 PPT - Resource-based View PowerPoint Presentation, free download - ID
Resource Based View  Theory, Types and Assumptions Resource Based View (RBV) - KMMB Konsultan Manajemen

Closure

Thus, we hope this article has provided valuable insights into Navigating the World of RWU: A Comprehensive Guide to Understanding and Utilizing Resource-Based Work Units. We appreciate your attention to our article. See you in our next article!

Navigating the Web with Ease: Understanding Image Map Responsiveness

Introduction

With enthusiasm, let’s navigate through the intriguing topic related to Navigating the Web with Ease: Understanding Image Map Responsiveness. Let’s weave interesting information and offer fresh perspectives to the readers.

Website Navigation Design Example & Best Practices

In the ever-evolving landscape of web design, user experience reigns supreme. Websites strive to provide seamless navigation, intuitive interactions, and captivating visual presentations. Image maps, a powerful tool for enhancing user engagement and interactivity, play a crucial role in achieving these goals. However, the effectiveness of image maps hinges on their ability to adapt seamlessly to different screen sizes and devices. This is where responsiveness comes into play.

Image maps, in essence, are clickable areas within an image that link to different web pages or sections. They provide a visually engaging way to navigate content, often replacing traditional text-based links. But in a world where users access websites on a multitude of devices, from desktops and laptops to smartphones and tablets, image maps must adapt to varying screen resolutions.

The Importance of Responsiveness in Image Maps

Responsiveness in image maps is paramount for several reasons:

  • Enhanced User Experience: Responsive image maps ensure that clickable areas remain easily accessible and clickable across all devices. This prevents frustration and promotes a smooth user journey, regardless of the screen size.
  • Optimized Navigation: By adapting to different screen sizes, responsive image maps maintain their intended functionality and visual appeal. This prevents distortions, overlaps, or misaligned clickable areas, ensuring that users can navigate content effortlessly.
  • Improved Accessibility: Responsive image maps are crucial for accessibility. They allow users with visual impairments or disabilities to navigate content effectively, ensuring inclusivity and equal access to information.
  • Mobile-First Approach: In today’s mobile-centric world, optimizing for mobile devices is essential. Responsive image maps ensure that websites perform optimally on smartphones and tablets, providing a seamless experience for a vast audience.

Understanding the Mechanics of Responsiveness

Achieving responsiveness in image maps involves a combination of techniques and considerations:

  • CSS Media Queries: This powerful tool allows developers to define different styles based on screen size, orientation, and other device-specific characteristics. By utilizing media queries, image map elements can be adjusted dynamically to fit the current viewport.
  • Flexible Image Sizes: Images used for image maps should be responsive, meaning they adjust their size based on the screen dimensions. This can be achieved through techniques like using percentage-based widths or employing the "max-width" CSS property.
  • Relative Positioning: Instead of using fixed pixel values for positioning clickable areas, developers can leverage relative positioning. This allows clickable areas to scale proportionally with the image, ensuring they remain clickable and accessible across all devices.
  • JavaScript Libraries: Specialized JavaScript libraries can assist in creating responsive image maps. These libraries often provide pre-built functionalities for managing clickable areas and ensuring their responsiveness.

Implementing Responsive Image Maps: A Practical Guide

Here’s a step-by-step guide on how to implement responsive image maps:

  1. Choose a Responsive Image: Select an image that scales well across different screen sizes. Avoid using large, pixelated images that can become blurry or distorted on smaller screens.
  2. Define Clickable Areas: Use the <map> and <area> tags in HTML to define the clickable areas within the image. Assign appropriate href attributes to each area to link to the desired web page or section.
  3. Utilize CSS Media Queries: Apply CSS media queries to adjust the size and position of the clickable areas based on screen size. This ensures that the clickable areas remain accessible and visually appealing on all devices.
  4. Test Across Devices: Thoroughly test your image map across various devices and screen sizes. This helps identify any potential issues with responsiveness and ensures a seamless user experience.

FAQs about Image Map Responsiveness

1. What are the common challenges in creating responsive image maps?

  • Maintaining Accuracy: Ensuring that clickable areas remain accurate and aligned across different screen sizes can be challenging, especially when dealing with complex image maps.
  • Performance Optimization: Large images can impact page load times, particularly on mobile devices. Optimizing image sizes and utilizing efficient loading techniques is crucial for maintaining performance.
  • Cross-Browser Compatibility: Ensuring that image maps function consistently across different web browsers can be a challenge due to variations in browser rendering engines.

2. How can I ensure that image maps are accessible to users with disabilities?

  • Use Descriptive Alt Text: Provide meaningful alternative text for the image map, describing its purpose and the clickable areas within it. This allows screen readers to convey the information to users with visual impairments.
  • Use ARIA Attributes: Utilize ARIA attributes to enhance accessibility, such as "aria-label" to provide additional context or "aria-disabled" to indicate disabled areas.
  • Consider Keyboard Navigation: Ensure that image maps are navigable using the keyboard, allowing users with motor impairments to interact with the content.

3. What are some tips for creating effective responsive image maps?

  • Keep It Simple: Avoid overly complex image maps with numerous clickable areas. This can lead to confusion and hinder navigation.
  • Use Clear Visual Cues: Employ contrasting colors, shapes, or icons to clearly define clickable areas and make them easily recognizable.
  • Provide Feedback: Offer visual feedback to users when they hover over or click on clickable areas. This helps confirm their interaction and enhances the user experience.
  • Test and Iterate: Continuously test your image map across different devices and screen sizes. Identify any issues with responsiveness and make necessary adjustments to improve the user experience.

Conclusion

Responsive image maps are an essential element of modern web design, providing a seamless and engaging user experience across all devices. By embracing the principles of responsiveness, websites can ensure that image maps remain functional, accessible, and visually appealing, regardless of the screen size. This fosters a positive user experience, encourages interaction, and ultimately contributes to the success of any website.

Website Navigation: Tips, Examples and Best Practices 10+ Site Map Templates to Visualize Your Website - Venngage What Is a Responsive Web Design: Understanding the Basics
5 Website Navigation Bar Examples To Enhance Your Web Design - Creative 10 Essential Benefits of Responsive Web Design 10+ Site Map Templates to Visualize Your Website - Venngage
Website navigation โ€“ how to make it easy to navigate your marketing site Top 10 Website Navigation Best Practices - Full Guide

Closure

Thus, we hope this article has provided valuable insights into Navigating the Web with Ease: Understanding Image Map Responsiveness. We hope you find this article informative and beneficial. See you in our next article!

st croix state park campground map

Introduction

With great pleasure, we will explore the intriguing topic related to st croix state park campground map. Let’s weave interesting information and offer fresh perspectives to the readers.

St. Croix State Park - Campsite Photos, Reservations & Camping Info

St. Croix State Park, nestled in the heart of Minnesota, offers a captivating blend of natural beauty, recreational opportunities, and historical significance. Its diverse landscapes, ranging from towering bluffs overlooking the St. Croix River to tranquil forests teeming with wildlife, attract visitors seeking solace and adventure. For those planning to experience the park’s magic firsthand, understanding its campground layout is crucial for a seamless and enjoyable stay.

Understanding the Campground Map: Your Key to a Successful St. Croix State Park Adventure

The St. Croix State Park campground map serves as an indispensable tool for navigating the park’s diverse camping options. This map is more than just a visual representation; it’s a gateway to a wealth of information that empowers visitors to make informed decisions about their camping experience.

Navigating the Campground Map:

  • Campground Types: The map clearly distinguishes between the different campground types available within the park, including:
    • Riverfront Campground: Offering breathtaking views of the St. Croix River and convenient access to the water’s edge, perfect for anglers and paddlers.
    • Forest Campground: Nestled amongst the park’s towering trees, providing a secluded and serene camping experience.
    • Group Campground: Designed for larger groups seeking a communal atmosphere, ideal for family reunions or scout outings.
  • Campsite Amenities: Each campsite is meticulously labeled on the map, indicating the specific amenities available, such as:
    • Electric hookups: For campers requiring power for their RVs or trailers.
    • Water hookups: Offering convenient access to potable water.
    • Flush toilets: Providing modern sanitation facilities.
    • Picnic tables: Enabling comfortable outdoor dining.
    • Fire rings: Allowing campers to enjoy the traditional campfire experience.
  • Park Amenities: The map also highlights essential park amenities, such as:
    • Hiking trails: Connecting campers to the park’s scenic hiking routes.
    • Boat launch: Providing access to the St. Croix River for boating and fishing.
    • Visitor center: Offering information about the park’s history, flora, and fauna.
    • Restrooms: Strategically placed throughout the park for convenience.
  • Accessibility: The map clearly identifies campsites and facilities accessible to visitors with disabilities, ensuring an inclusive experience for all.

Benefits of Utilizing the Campground Map:

  • Informed Decision-Making: The map empowers campers to select campsites that best suit their preferences and needs, ensuring a comfortable and enjoyable stay.
  • Efficient Navigation: The map acts as a guide, helping campers easily locate their campsites and navigate the park’s diverse features.
  • Safety and Security: By clearly marking campsites and amenities, the map promotes safety and security, allowing campers to quickly access necessary facilities.
  • Enhanced Experience: The map facilitates a deeper appreciation of the park’s natural beauty and recreational opportunities, enhancing the overall camping experience.

Accessing the Campground Map:

  • Online: The St. Croix State Park website provides a downloadable PDF version of the campground map, allowing campers to access it conveniently from their devices.
  • Park Office: Printed copies of the campground map are available at the park office for visitors to collect upon arrival.
  • Campground Kiosk: A map is typically displayed at the entrance of each campground for easy reference.

FAQs about the St. Croix State Park Campground Map:

Q: Is the campground map updated regularly?

A: The park strives to keep the campground map up-to-date, reflecting any changes in campsite availability, amenities, or park features. However, it’s always advisable to check with the park office for the most recent version.

Q: Are there any designated campsites for specific activities like fishing or boating?

A: The map clearly indicates campsites located near the St. Croix River, offering convenient access for fishing and boating enthusiasts.

Q: Are there any specific campsites reserved for families with young children?

A: While there are no designated "family" campsites, the map highlights campsites with amenities like picnic tables and fire rings, suitable for families with children.

Q: Can I reserve a specific campsite in advance?

A: Yes, reservations for campsites can be made online through the Minnesota Department of Natural Resources website.

Q: Are there any restrictions on the size or type of RV allowed in certain campsites?

A: The map provides information on the maximum RV length allowed in each campsite, ensuring a comfortable fit for campers.

Tips for Utilizing the St. Croix State Park Campground Map:

  • Plan Ahead: Before arriving at the park, study the campground map to choose the best campsite for your needs and preferences.
  • Familiarize Yourself: Upon arrival, take a moment to familiarize yourself with the campground layout and the location of key amenities.
  • Share the Map: Share the map with your fellow campers to ensure everyone understands the campsite location and park features.
  • Keep It Handy: Always keep the campground map handy for easy reference throughout your stay.
  • Respect the Environment: Use the map to navigate trails and campsites responsibly, minimizing your impact on the natural environment.

Conclusion:

The St. Croix State Park campground map is more than just a piece of paper; it’s a key to unlocking a memorable and enriching camping experience. By understanding its details and utilizing it effectively, visitors can navigate the park’s diverse offerings, choose the perfect campsite, and appreciate the full spectrum of its natural beauty and recreational opportunities. Whether seeking solitude amidst towering trees or adventure along the scenic river, the campground map serves as a valuable companion, ensuring a seamless and enjoyable journey through the heart of St. Croix State Park.

St Croix State Park Campground Map - Maps For You St Croix State Park Campground Map - Catha Daloris St Croix State Park Campground Map - Maping Resources
St Croix State Park Campground Map - Maping Resources St Croix State Park Campground Map - Maping Resources St Croix State Park Campground Map - Maps For You
St Croix State Park Campground Map - Maping Resources St. Croix State Park  TrailMeister

Closure

Thus, we hope this article has provided valuable insights into st croix state park campground map. We appreciate your attention to our article. See you in our next article!

A Journey Through the Roof of the World: Unveiling the Himalayan Mountains on the Map of India

Introduction

With great pleasure, we will explore the intriguing topic related to A Journey Through the Roof of the World: Unveiling the Himalayan Mountains on the Map of India. Let’s weave interesting information and offer fresh perspectives to the readers.

A Journey Through the Roof of the World: Unveiling the Himalayan Mountains on the Map of India

Himalayan Mountains Map  MAP3

The Himalayan Mountains, often referred to as the "Roof of the World," are a majestic and awe-inspiring geographical feature that dominates the northern landscape of India. This colossal mountain range, stretching across a vast expanse, holds immense cultural, ecological, and economic significance for the country. Understanding the intricate relationship between the Himalayas and India necessitates a comprehensive exploration of their geographical representation on the map.

Mapping the Himalayas: A Geographical Perspective

The Himalayan range, encompassing the Karakoram, Ladakh, and Hindu Kush mountain ranges, extends over 2,400 kilometers across the northern border of India, encompassing the states of Jammu & Kashmir, Himachal Pradesh, Uttarakhand, Sikkim, and Arunachal Pradesh. Its jagged peaks, deep valleys, and sprawling glaciers create a breathtaking panorama that has captivated explorers, adventurers, and spiritual seekers for centuries.

The Himalayan Landscape: A Tapestry of Diversity

The Himalayas are not a singular entity but a complex tapestry of diverse landscapes. The region is characterized by a wide range of elevations, from the snow-capped peaks of Mount Everest and Kangchenjunga to the lush valleys of the foothills. This variation in altitude creates distinct ecological zones, each with its own unique flora and fauna.

  • High-Altitude Zones: Above 5,000 meters, the landscape is dominated by glaciers, snowfields, and rocky terrain. This harsh environment is home to hardy species like the snow leopard, yak, and Himalayan marmot.
  • Alpine Zones: Between 3,500 and 5,000 meters, the alpine zone features meadows, forests, and rocky slopes. This region is home to a diverse array of plants and animals, including rhododendrons, blue sheep, and musk deer.
  • Sub-Alpine Zones: Between 2,500 and 3,500 meters, the sub-alpine zone is characterized by dense coniferous forests, including pine, fir, and spruce. This zone is also home to a variety of birds, including the Himalayan monal and the golden eagle.
  • Temperate Zones: Below 2,500 meters, the temperate zone features deciduous forests, grasslands, and agricultural lands. This region is home to a wide variety of species, including tigers, leopards, and elephants.

The Himalayas: A Lifeline for India

The Himalayan Mountains play a crucial role in the ecological and economic well-being of India.

  • Water Resources: The Himalayas are the source of ten major river systems, including the Ganga, Brahmaputra, Indus, and Yamuna, which provide water for agriculture, industry, and drinking purposes across India.
  • Biodiversity Hotspot: The Himalayas are a biodiversity hotspot, home to a vast array of plants and animals, many of which are endemic to the region. This rich biodiversity is crucial for maintaining ecological balance and providing valuable resources for research and development.
  • Tourism and Recreation: The Himalayas are a popular destination for adventure tourism, trekking, and mountaineering. This sector contributes significantly to the economy of the region and provides employment opportunities for local communities.
  • Spiritual and Cultural Significance: The Himalayas have been revered as sacred mountains in Hinduism, Buddhism, and other religions. They are home to numerous temples, monasteries, and pilgrimage sites, which attract millions of visitors every year.

Challenges and Conservation Efforts

Despite their immense value, the Himalayas face a number of challenges, including:

  • Climate Change: The Himalayan glaciers are retreating at an alarming rate due to global warming, threatening water security and increasing the risk of natural disasters.
  • Deforestation: Unsustainable logging and agricultural practices are leading to deforestation, which is eroding soil, reducing biodiversity, and increasing the risk of landslides.
  • Pollution: Industrial pollution and waste disposal are contaminating rivers and streams, impacting water quality and human health.
  • Population Growth: Rapid population growth in the Himalayan region is putting pressure on natural resources and increasing the need for infrastructure development.

To address these challenges, a number of conservation efforts are underway, including:

  • Sustainable Agriculture: Promoting sustainable farming practices to reduce soil erosion and improve water management.
  • Forest Conservation: Implementing policies to protect forests and promote afforestation.
  • Waste Management: Improving waste collection and disposal systems to reduce pollution.
  • Climate Change Mitigation: Implementing measures to reduce greenhouse gas emissions and adapt to the impacts of climate change.

The Himalayan Mountains: A Source of Inspiration

The Himalayas are not just a geographical feature but a source of inspiration and wonder. Their towering peaks, breathtaking landscapes, and rich cultural heritage have captivated the imagination of generations. The Himalayas are a reminder of the power and beauty of nature and the importance of preserving our planet for future generations.

FAQs: Unveiling the Mysteries of the Himalayas

1. What is the highest peak in the Himalayas?

Mount Everest, with a height of 8,848.86 meters, is the highest peak in the Himalayas and the world.

2. Which countries share the Himalayan range?

The Himalayan range spans across five countries: India, Nepal, China, Pakistan, and Bhutan.

3. What are some of the major rivers that originate in the Himalayas?

The major rivers originating in the Himalayas include the Ganga, Brahmaputra, Indus, Yamuna, and Sutlej.

4. What are some of the popular trekking destinations in the Himalayas?

Popular trekking destinations in the Himalayas include the Annapurna Circuit in Nepal, the Everest Base Camp trek in Nepal, and the Markha Valley trek in Ladakh, India.

5. What are the major threats to the Himalayan ecosystem?

The major threats to the Himalayan ecosystem include climate change, deforestation, pollution, and population growth.

Tips for Exploring the Himalayas

  • Plan your trip carefully: Research the best time to visit, the trekking routes, and the necessary permits and equipment.
  • Respect the environment: Practice Leave No Trace principles, pack out all your trash, and avoid disturbing wildlife.
  • Be prepared for the weather: The Himalayas can experience extreme weather conditions, so be sure to pack appropriate clothing and gear.
  • Hire a local guide: A local guide can provide valuable insights into the culture, history, and environment of the region.
  • Support local communities: Stay in local guesthouses, eat at local restaurants, and purchase souvenirs from local artisans.

Conclusion: A Legacy for the Future

The Himalayan Mountains are a vital part of India’s natural and cultural heritage. Understanding their geographical significance, ecological importance, and the challenges they face is crucial for ensuring their preservation for future generations. By promoting sustainable development, conservation efforts, and responsible tourism, we can help protect this magnificent mountain range and ensure that its beauty and inspiration continue to captivate the world.

Himalayan Mountains: Himalayan Mountains Map Map Of Himalaya Mountains World Map Himalayan Mountains Location
Himalayan Mountains Location On World Map - Map Spatial spread of the Himalayan mountain system across seven nations World Map Himalayan Mountains Location
Mountain Passes โ€“ India & Himalayas  PMF IAS Himalayan Mountains Location On World Map

Closure

Thus, we hope this article has provided valuable insights into A Journey Through the Roof of the World: Unveiling the Himalayan Mountains on the Map of India. We thank you for taking the time to read this article. See you in our next article!

Navigating Salem, Oregon: A Comprehensive Guide to Zip Code Boundaries

Introduction

With great pleasure, we will explore the intriguing topic related to Navigating Salem, Oregon: A Comprehensive Guide to Zip Code Boundaries. Let’s weave interesting information and offer fresh perspectives to the readers.

Salem Oregon Zip Code Map - Maps For You

Salem, the capital of Oregon, is a city brimming with history, natural beauty, and a vibrant community. Understanding its intricate network of zip codes is crucial for residents, businesses, and visitors alike. This guide provides a comprehensive overview of Salem’s zip code map, highlighting its significance and offering insights into navigating the city’s diverse districts.

Understanding Salem’s Zip Code Map: A Framework for Organization

Salem’s zip code map is a valuable tool for a multitude of purposes, serving as a framework for:

  • Efficient Mail Delivery: The primary function of zip codes is to streamline postal services. By dividing the city into distinct areas, the United States Postal Service (USPS) ensures efficient delivery of mail and packages.
  • Locating Businesses and Services: Zip codes are essential for finding specific businesses and services within Salem. Online maps and directories often utilize zip codes to pinpoint locations, aiding in navigation and search queries.
  • Identifying Neighborhood Boundaries: While not always perfectly aligned, zip codes often reflect general neighborhood boundaries, providing a sense of community and local identity.
  • Understanding Demographic Data: Zip codes can be used to analyze demographic data, providing insights into population density, income levels, and other characteristics of different areas within Salem.
  • Emergency Services and Public Safety: Zip codes are crucial for emergency response teams to quickly locate addresses and dispatch the appropriate resources in times of need.

Exploring Salem’s Zip Code Districts: A Journey Through Diverse Neighborhoods

Salem’s zip code map encompasses a variety of neighborhoods, each with its own unique character and charm:

Central Salem (97301, 97302): This bustling area is home to the state capitol building, the historic downtown district, and numerous government offices. It is a hub for cultural attractions, restaurants, and shopping.

South Salem (97302, 97306, 97309): This expansive area encompasses residential neighborhoods, parks, and major shopping centers. It is known for its quiet suburban atmosphere and proximity to Interstate 5.

North Salem (97303, 97304, 97308): This area boasts a mix of residential neighborhoods, commercial districts, and industrial areas. It is home to the Salem Airport and several parks.

East Salem (97301, 97302, 97309): This area is characterized by its proximity to the Willamette River and its diverse mix of residential, commercial, and industrial properties.

West Salem (97304, 97308): This area is largely residential, with a mix of single-family homes, apartments, and townhouses. It is known for its proximity to the Chemeketa Community College campus.

Understanding the Nuances of Zip Code Boundaries:

While zip codes provide a general framework for understanding Salem’s geography, it’s important to note that:

  • Zip code boundaries are not always perfectly aligned with neighborhood boundaries. There may be instances where a single zip code encompasses multiple neighborhoods or where a single neighborhood spans across multiple zip codes.
  • Zip codes can change over time. As cities grow and evolve, the USPS may adjust zip code boundaries to reflect changing demographics and postal needs.
  • Zip codes are not the same as street addresses. While a zip code provides a general location, a street address is essential for precise identification.

Frequently Asked Questions about Salem’s Zip Code Map:

Q: How can I find the zip code for a specific address in Salem?
A: There are several resources available online to find zip codes for specific addresses, including the USPS website, Google Maps, and other mapping services.

Q: What is the difference between a zip code and a ZIP+4 code?
A: A ZIP+4 code is an extension of the standard five-digit zip code, providing more specific location information for mail delivery. It is often used by businesses to ensure accurate mail delivery to specific addresses within a zip code.

Q: Are there any resources available to help me understand Salem’s zip code map in detail?
A: The USPS website provides detailed information about zip code boundaries, as well as maps and other resources for navigating the postal system.

Tips for Using Salem’s Zip Code Map Effectively:

  • Utilize online mapping services: Google Maps, Bing Maps, and other online mapping services offer detailed maps of Salem’s zip code boundaries, allowing you to easily visualize the different areas of the city.
  • Consult the USPS website: The USPS website provides comprehensive information about zip codes, including boundary maps and other resources for understanding the postal system.
  • Look for local resources: The Salem Chamber of Commerce, local community organizations, and neighborhood associations may have additional resources and information about specific neighborhoods and zip codes within the city.

Conclusion: A Framework for Understanding and Navigating Salem

Salem’s zip code map is an essential tool for understanding the city’s diverse neighborhoods and navigating its intricate network of streets and addresses. By utilizing this resource effectively, residents, businesses, and visitors can gain valuable insights into the city’s geography, its communities, and its services.

Salem Oregon Zip Code Map โ€“ Map VectorCampus Map Salem Zip Code Map Salem, OR Metro Area Zip Code Wall Map Basic Style by MarketMAPS
Salem Oregon Zip Code Map โ€“ Map VectorCampus Map Salem Oregon Zip Code Map Salem Oregon Zip Code Map - Maping Resources
Oregon Zip Code Map Free Oregon Zip Code Map: Everything You Need To Know - Neebish Island

Closure

Thus, we hope this article has provided valuable insights into Navigating Salem, Oregon: A Comprehensive Guide to Zip Code Boundaries. We thank you for taking the time to read this article. See you in our next article!

Navigating Chicago: A Comprehensive Guide to Divvy Bike Stations and Their Impact

Introduction

With great pleasure, we will explore the intriguing topic related to Navigating Chicago: A Comprehensive Guide to Divvy Bike Stations and Their Impact. Let’s weave interesting information and offer fresh perspectives to the readers.

Divvy Bikes

Chicago, a city renowned for its sprawling urban landscape, has embraced the bicycle as a key mode of transportation. Divvy, the city’s bike-sharing program, has transformed how residents and visitors explore the Windy City. This article delves into the intricate network of Divvy bike stations, analyzing its importance and benefits for the city and its inhabitants.

Understanding the Divvy Bike Station Network

The Divvy bike station network is a meticulously planned infrastructure that seamlessly integrates with Chicago’s urban fabric. It comprises hundreds of stations strategically located throughout the city, ensuring accessibility and convenience for users. Each station is equipped with a designated docking area for bikes, providing a secure and organized system for bike retrieval and return.

Divvy Bike Station Map: Your Guide to Urban Exploration

The Divvy bike station map is an indispensable tool for navigating the city’s bike-sharing system. It provides a visual representation of the entire network, showcasing the location of each station. The map is easily accessible online and through the Divvy mobile app, allowing users to plan their routes and identify the closest station to their starting point or destination.

The Benefits of Divvy Bike Stations for Chicago

The Divvy bike station network has profoundly impacted Chicago, offering numerous benefits:

  • Sustainable Transportation: Divvy bikes encourage residents and visitors to choose a sustainable mode of transportation, reducing reliance on cars and contributing to a cleaner environment.

  • Traffic Congestion Mitigation: By providing an alternative to car travel, Divvy bikes help alleviate traffic congestion, improving the flow of vehicles and reducing travel times.

  • Enhanced Accessibility: The widespread network of Divvy bike stations ensures easy access to transportation for people of all backgrounds, promoting inclusivity and accessibility in the city.

  • Improved Health and Wellness: Cycling is a great way to stay active and healthy, and Divvy bikes offer an accessible and convenient option for residents to incorporate physical activity into their daily routines.

  • Economic Boost: Divvy bike stations contribute to the city’s economic growth by attracting tourists and promoting tourism-related activities.

Exploring the Divvy Bike Station Map: Key Features

The Divvy bike station map is a user-friendly tool designed to facilitate seamless navigation:

  • Station Locations: The map clearly displays the location of each Divvy bike station, providing users with a comprehensive overview of the network.

  • Station Availability: The map often indicates the number of bikes available at each station, allowing users to identify stations with sufficient bike availability.

  • Real-Time Information: Some versions of the map provide real-time information about bike availability and station status, ensuring users have access to up-to-date data.

  • Route Planning: The map can be used to plan routes, identifying the most efficient path between two points using Divvy bikes.

  • Integration with Other Transportation Modes: The map may also integrate with other transportation modes, such as public transit, allowing users to plan multimodal journeys.

Frequently Asked Questions (FAQs) About Divvy Bike Stations in Chicago

Q: How do I find a Divvy bike station near me?

A: You can use the Divvy mobile app or the online map to locate the nearest station. Simply enter your current location or a specific address, and the map will display nearby stations.

Q: How do I use a Divvy bike?

A: You can purchase a Divvy membership or a single-trip pass. To use a bike, you will need to unlock it using your Divvy membership card or the mobile app. Once you are finished with your ride, dock the bike at any available station.

Q: How much does it cost to use a Divvy bike?

A: Divvy offers various membership options and single-trip passes, with varying costs. You can find detailed pricing information on the Divvy website or mobile app.

Q: Are Divvy bikes safe to use?

A: Divvy bikes are designed for safety and undergo regular maintenance. However, it is important to follow all traffic laws and wear a helmet while riding.

Q: What happens if I lose my Divvy membership card?

A: If you lose your membership card, you can contact Divvy customer support to report it and request a replacement.

Q: Can I use a Divvy bike to travel outside of Chicago?

A: Divvy bikes are primarily designed for use within the city limits. However, there may be some limited areas outside of Chicago where Divvy bikes are available.

Tips for Using Divvy Bike Stations in Chicago

  • Plan Your Route: Utilize the Divvy bike station map or mobile app to plan your route and identify the most efficient path between your starting point and destination.

  • Check Bike Availability: Before heading to a station, check the map or app to ensure there are bikes available.

  • Be Aware of Traffic Laws: Follow all traffic laws and regulations while riding a Divvy bike, ensuring a safe and enjoyable experience.

  • Wear a Helmet: Always wear a helmet for safety, especially in urban environments.

  • Respect Other Users: Be courteous to other bike riders and pedestrians, sharing the road responsibly.

  • Dock Your Bike Properly: Ensure you properly dock your bike at the designated station after your ride, contributing to the smooth operation of the system.

Conclusion: The Impact of Divvy Bike Stations on Chicago

The Divvy bike station network has become an integral part of Chicago’s urban landscape, significantly impacting the city’s transportation, environment, and overall quality of life. By promoting sustainable transportation, enhancing accessibility, and fostering a sense of community, Divvy bike stations have contributed to a more vibrant and livable city. As the network continues to expand and evolve, it will undoubtedly play an even greater role in shaping the future of Chicago’s urban mobility.

Divvy Bike Guide - Free Chicago Walking Tours Divvy bicycle stations in the city of Chicago.  Download Scientific Divvy adds eight new bike sharing stations in Hyde Park
Open Data Viz: The Chicago Divvy Bike Station Tracker - InterWorks Google Maps partners with Divvy to show stations, available bikes Here's a Map of Where To Get a Divvy Bike in Chicago โ€“ Chicago Magazine
HOW TO GET AROUND CHICAGO USING DIVVY BIKE SHARING SYSTEM - Biking Google Maps partners with Divvy to show stations, available bikes

Closure

Thus, we hope this article has provided valuable insights into Navigating Chicago: A Comprehensive Guide to Divvy Bike Stations and Their Impact. We thank you for taking the time to read this article. See you in our next article!

Unlocking the Night Sky: A Guide to NASA’s Celestial Archives

Introduction

In this auspicious occasion, we are delighted to delve into the intriguing topic related to Unlocking the Night Sky: A Guide to NASA’s Celestial Archives. Let’s weave interesting information and offer fresh perspectives to the readers.

Unlocking the Night Sky: A Guide to NASA’s Celestial Archives

Unlocking the Mysteries of the Night Sky: A Comprehensive Guide to

The vast expanse of the cosmos, with its countless stars, planets, and galaxies, has captivated humanity for millennia. While we might gaze upwards and marvel at the night sky, understanding the celestial tapestry requires more than just casual observation. Fortunately, NASA, through its wealth of scientific data and advanced technology, offers a unique window into the universe โ€“ the ability to explore the night sky as it appeared on any given date, past or present.

Navigating the Celestial Tapestry: An Introduction to NASA’s Star Maps

NASA’s star maps, accessible through various online platforms, provide a comprehensive and interactive tool for exploring the cosmos. These maps, meticulously crafted using data from NASA’s telescopes and space missions, offer a glimpse into the celestial landscape as it would have appeared from Earth on any specific date and time.

Key Features of NASA’s Star Maps:

  • Interactive Interface: Most NASA star map platforms provide an intuitive interface that allows users to select a specific date and time, adjust the viewing location, and zoom in and out on the celestial map.
  • Detailed Information: Each celestial object displayed on the map is accompanied by detailed information, including its name, constellation, magnitude, and distance from Earth.
  • Historical Accuracy: These maps are based on precise astronomical data, ensuring historical accuracy in depicting the position of stars and planets at any given point in time.
  • Constellation Recognition: The maps clearly highlight constellations, making it easier to identify and understand the patterns in the night sky.
  • Personalized Viewing Experience: Users can customize the map to display specific objects, constellations, or celestial events, tailoring their exploration to their interests.

Beyond Stargazing: The Applications of NASA’s Star Maps

While star maps are a valuable tool for amateur astronomers, their applications extend far beyond recreational stargazing. They play a crucial role in various fields, including:

  • Astronomical Research: Scientists utilize these maps to study the movement of celestial objects, track the evolution of stars, and gain insights into the structure and dynamics of the universe.
  • Space Exploration: NASA engineers and mission planners rely on star maps to navigate spacecraft, plan trajectories, and ensure successful missions to distant planets and celestial bodies.
  • Education and Outreach: These maps serve as invaluable educational resources, enabling students and the public to learn about astronomy, celestial navigation, and the history of our universe.
  • Historical Reconstruction: Star maps can be used to reconstruct the night sky as it appeared during significant historical events, offering a unique perspective on past civilizations and their understanding of the cosmos.
  • Cultural and Artistic Inspiration: The beauty and complexity of the night sky, as depicted in these maps, have inspired countless works of art, literature, and music, showcasing the enduring human fascination with the cosmos.

Understanding the Science Behind NASA’s Star Maps

The accuracy of NASA’s star maps stems from a combination of advanced technology and sophisticated scientific principles. Here’s a glimpse into the underlying science:

  • Astrometry: This branch of astronomy focuses on measuring the positions and motions of celestial objects. Data from telescopes like the Hubble Space Telescope and Gaia mission provide the foundation for accurate star positions and movement calculations.
  • Ephemeris Data: This refers to tables that predict the positions of celestial objects over time. NASA’s Jet Propulsion Laboratory (JPL) maintains an extensive database of ephemeris data, which is used to generate accurate star maps.
  • Celestial Mechanics: This field of physics studies the motion of celestial bodies under the influence of gravity. By applying the laws of celestial mechanics, scientists can predict the future positions of stars, planets, and other celestial objects.
  • Software Algorithms: Sophisticated software algorithms process and analyze the vast amounts of data from telescopes and ephemeris tables, generating interactive star maps that reflect the complex movements of celestial bodies.

Exploring the Night Sky: A User’s Guide to NASA’s Star Maps

To navigate the celestial tapestry, several online platforms offer access to NASA’s star maps. Here are some popular options:

  • NASA’s Eyes on the Solar System: This interactive website allows users to explore the solar system in 3D, including the positions of planets, moons, and spacecraft. It offers a dynamic and engaging way to visualize the celestial landscape.
  • Stellarium: This free open-source planetarium software simulates the night sky from any location on Earth. It features a vast database of stars, planets, and constellations, allowing users to explore the night sky in detail.
  • SkySafari: This popular astronomy app provides a comprehensive stargazing experience, including star maps, constellation identification, and planet tracking. It offers both free and paid versions with varying features.
  • Google Sky: This online platform allows users to explore the night sky through Google Maps. It features imagery from telescopes like the Hubble Space Telescope, providing a stunning visual representation of the cosmos.

FAQs on NASA’s Star Maps:

1. What is the difference between a star chart and a star map?

While the terms are often used interchangeably, a star chart typically focuses on the positions of stars within a specific constellation, while a star map provides a broader view of the night sky, including planets, constellations, and other celestial objects.

2. Can I use NASA’s star maps to identify objects in the real night sky?

Yes, NASA’s star maps can be used to identify objects in the real night sky. However, remember that the map reflects the celestial landscape as it appears from a specific location on Earth. Therefore, you might need to adjust the viewing location on the map to match your current position.

3. How accurate are NASA’s star maps?

NASA’s star maps are based on precise astronomical data and are highly accurate. However, the positions of celestial objects are constantly changing, so minor discrepancies between the map and the actual night sky are possible.

4. Are NASA’s star maps available for past dates?

Yes, most NASA star map platforms allow users to select any date in the past, allowing them to explore the night sky as it appeared at a specific point in history.

5. How can I use NASA’s star maps for research purposes?

NASA’s star maps can be used for various research purposes, including studying the movement of celestial objects, tracking the evolution of stars, and analyzing the structure of the universe. Researchers can access raw data from NASA’s telescopes and ephemeris tables to conduct in-depth analysis.

Tips for Using NASA’s Star Maps:

  • Start with a Familiar Location: Begin by exploring the night sky as it appears from your current location to get a sense of the celestial landscape.
  • Experiment with Different Dates: Explore the night sky on various dates to understand how the positions of celestial objects change over time.
  • Use the Search Function: Utilize the search function to locate specific objects, constellations, or celestial events.
  • Zoom In and Out: Adjust the zoom level to view the night sky in detail or get a broader perspective.
  • Explore Different Viewing Locations: Change the viewing location on the map to see how the night sky appears from different parts of the world.
  • Utilize Additional Resources: Combine NASA’s star maps with other astronomy resources, such as books, websites, and apps, to enhance your understanding of the cosmos.

Conclusion

NASA’s star maps, a testament to the power of science and technology, provide a unique window into the universe. They offer a captivating and informative way to explore the celestial tapestry, uncovering the intricate beauty and dynamics of the cosmos. Whether you’re an amateur astronomer, a student, or simply curious about the wonders of the night sky, NASA’s star maps offer an unparalleled journey of discovery. By harnessing the power of these celestial archives, we can unlock the secrets of the universe and gain a deeper appreciation for our place within it.

Night Sky Constellations Naming History  Skywatching  Live Science Unlocking the Night Sky: A Guide to Using the Nikon D3500 for Night Sky Network - NASA Science
In a vast celestial observatory, a brilliant astronomer gazes into the In a vast celestial observatory, a brilliant astronomer gazes into the In a vast celestial observatory, a brilliant astronomer gazes into the
NASA Astronomy Picture of the Day 3 January 2023: Kemble's Cascade of Unlocking the Night Sky: A Guide to Canon R5 Astrophotography

Closure

Thus, we hope this article has provided valuable insights into Unlocking the Night Sky: A Guide to NASA’s Celestial Archives. We appreciate your attention to our article. See you in our next article!

Navigating the Seasons: A Comprehensive Guide to Wisconsin’s Growing Zones

Introduction

In this auspicious occasion, we are delighted to delve into the intriguing topic related to Navigating the Seasons: A Comprehensive Guide to Wisconsin’s Growing Zones. Let’s weave interesting information and offer fresh perspectives to the readers.

Wisconsin Planting Zones - Growing Zone Map  Gilmour

Wisconsin, known for its picturesque landscapes and diverse ecosystems, presents a unique challenge for gardeners and farmers alike: navigating the state’s varied climate. To help individuals understand the optimal planting times and suitable plant varieties for specific regions, the USDA Plant Hardiness Zone Map has been developed. This map, a valuable tool for horticultural success, divides the United States into zones based on average annual minimum winter temperatures.

Understanding the Zones: A Foundation for Success

Wisconsin, with its distinct seasonal shifts, falls within USDA Plant Hardiness Zones 3 through 6. This means that different regions within the state experience varying levels of cold temperatures during the winter months.

  • Zone 3: This zone, encompassing the northernmost parts of Wisconsin, experiences the coldest temperatures, with average annual minimum temperatures ranging from -40 to -30 degrees Fahrenheit.
  • Zone 4: Located south of Zone 3, this zone experiences slightly milder winters, with average annual minimum temperatures ranging from -30 to -20 degrees Fahrenheit.
  • Zone 5: This zone covers a significant portion of central and southern Wisconsin, with average annual minimum temperatures ranging from -20 to -10 degrees Fahrenheit.
  • Zone 6: The southernmost region of Wisconsin, encompassing a small area along the border with Illinois, experiences the warmest winters, with average annual minimum temperatures ranging from -10 to 0 degrees Fahrenheit.

Decoding the Map: Unveiling the Secrets of Successful Gardening

The USDA Plant Hardiness Zone Map is a valuable resource for gardeners and farmers in Wisconsin. Understanding the specific zone for a given location allows individuals to:

  • Select appropriate plant varieties: Each zone designates the plants that can thrive in that specific temperature range. Choosing plants that are well-suited to the local climate ensures optimal growth and survival.
  • Determine the optimal planting time: Knowing the average last frost date and the first frost date for a particular zone helps individuals choose the appropriate time to plant their seeds or seedlings. This ensures that the plants have ample time to establish themselves before the onset of cold weather.
  • Plan for winter protection: The map provides insights into the severity of winter conditions, allowing individuals to prepare for potential frost damage or harsh weather events. This might involve using protective measures such as mulching, winterizing plants, or providing shelter.

Beyond the Map: Factors Affecting Plant Growth

While the USDA Plant Hardiness Zone Map provides a valuable starting point, other factors can also influence plant growth and survival in Wisconsin:

  • Microclimates: Variations in topography, elevation, and proximity to bodies of water can create localized microclimates that affect temperatures and growing conditions.
  • Soil type: Different soil types possess varying water-holding capacities and drainage properties, influencing plant growth and survival.
  • Sunlight exposure: The amount of sunlight a plant receives plays a crucial role in its growth and development.
  • Wind patterns: Wind can exacerbate cold temperatures and increase the risk of frost damage.

FAQs: Addressing Common Questions

Q: What is the difference between a hardiness zone and a growing zone?

A: A hardiness zone focuses on the minimum winter temperatures a plant can tolerate. A growing zone, on the other hand, considers the length of the growing season, the number of frost-free days, and the overall climate suitability for specific crops.

Q: Can I plant a plant that is rated for a warmer zone in Wisconsin?

A: While it is possible to try, it is not recommended. Plants that are not adapted to the colder temperatures of Wisconsin are more likely to experience frost damage or fail to thrive.

Q: How can I find the hardiness zone for my specific location?

A: You can use the USDA Plant Hardiness Zone Map, which is available online and in print. You can also consult local nurseries or gardening experts for assistance.

Tips for Success: Cultivating a Thriving Garden

  • Consult with local experts: Connect with local nurseries, garden centers, or agricultural extension offices for advice on plant selection, planting times, and winter protection strategies.
  • Start with a small garden: Begin with a smaller garden and gradually expand as you gain experience and learn about the local growing conditions.
  • Experiment with different plant varieties: Try different plant varieties within your hardiness zone to determine which ones perform best in your specific location.
  • Observe your garden closely: Pay attention to the growth and development of your plants, noting any signs of stress or damage.
  • Embrace the challenges: Gardening in Wisconsin can be rewarding, but it also requires patience, adaptability, and a willingness to learn from experience.

Conclusion: Embracing the Challenge of Wisconsin’s Climate

Wisconsin’s diverse climate presents both challenges and opportunities for gardeners and farmers. By understanding the USDA Plant Hardiness Zone Map and considering other factors that influence plant growth, individuals can cultivate thriving gardens and landscapes that reflect the beauty and resilience of the state. With careful planning, observation, and a touch of horticultural expertise, Wisconsin’s unique climate can be transformed into a canvas for vibrant and flourishing gardens.

State Maps of USDA Plant Hardiness Zones Wisconsin Plant Hardiness Zone Map  Fruit trees backyard, Plant Where In Wisconsin Do Hardiness Zone Shifts Reflect A Changing Climate
Where In Wisconsin Do Hardiness Zone Shifts Reflect A Changing Climate Desertscape Landscaping of Appleton Where In Wisconsin Do Hardiness Zone Shifts Reflect A Changing Climate
What's in Season? Wisconsin Produce Calendar  When to plant vegetables Plant Hardiness Zones  The How Do Gardener

Closure

Thus, we hope this article has provided valuable insights into Navigating the Seasons: A Comprehensive Guide to Wisconsin’s Growing Zones. We thank you for taking the time to read this article. See you in our next article!

Navigating the Terrain: A Guide to Understanding Sinkholes in Spring Hill, Florida

Introduction

With great pleasure, we will explore the intriguing topic related to Navigating the Terrain: A Guide to Understanding Sinkholes in Spring Hill, Florida. Let’s weave interesting information and offer fresh perspectives to the readers.

Spring hill fl sinkhole map - chenprinter

Spring Hill, Florida, a vibrant community nestled in the heart of Hernando County, is known for its picturesque landscapes and relaxed atmosphere. However, beneath its serene surface lies a geological reality that residents and prospective homeowners must be aware of: sinkholes.

These geological formations, characterized by depressions in the ground caused by the collapse of underlying rock, are a natural phenomenon prevalent in Florida due to its unique karst topography. While sinkholes can occur anywhere, understanding their prevalence and potential risks in Spring Hill is crucial for informed decision-making.

Delving into the Geology: Understanding the Formation of Sinkholes in Spring Hill

Florida’s landscape is shaped by its underlying geology, specifically the presence of soluble rock formations like limestone and dolomite. These rocks, over millions of years, have been dissolved by acidic groundwater, creating vast underground networks of caves and channels. When the roof of these underground cavities collapses, it leaves behind a depression on the surface, forming a sinkhole.

The formation of sinkholes can be influenced by several factors:

  • Rainfall: Heavy rainfall can saturate the ground, increasing the weight on the overlying soil and putting pressure on underground cavities. This can trigger the collapse of the cavity roof, leading to sinkhole formation.
  • Groundwater Levels: Fluctuations in groundwater levels can weaken the support structure of underground cavities, making them more susceptible to collapse.
  • Human Activities: Construction, landscaping, and other human activities can disrupt the natural balance of the soil and groundwater, increasing the risk of sinkhole development.

The Spring Hill Sinkhole Map: A Vital Tool for Understanding Risk

The Spring Hill Sinkhole Map, a valuable resource maintained by Hernando County, provides residents and property owners with a comprehensive overview of sinkhole occurrences in the area. This map is a powerful tool for:

  • Identifying high-risk areas: The map highlights areas where sinkholes have been reported in the past, providing a visual representation of potential risks.
  • Informing real estate decisions: Prospective buyers can use the map to assess the risk of sinkhole formation in potential properties, making informed decisions about their investments.
  • Guiding development plans: Developers and contractors can utilize the map to identify areas where sinkhole mitigation measures might be necessary, ensuring the safety and stability of their projects.
  • Raising awareness: The map serves as a valuable educational tool, raising awareness about the potential for sinkholes in Spring Hill and encouraging responsible land management practices.

Beyond the Map: Exploring Further Resources and Understanding Mitigation Strategies

While the Spring Hill Sinkhole Map is a vital resource, it’s essential to understand that it is a snapshot in time. Sinkholes can develop in areas not previously identified on the map, and the risk of sinkhole formation can change over time due to various factors.

For comprehensive information and guidance, residents can consult:

  • Hernando County Building Department: This department provides information on building codes and regulations related to sinkhole mitigation, ensuring compliance with safety standards.
  • Florida Department of Environmental Protection (DEP): The DEP offers valuable resources and information on sinkhole prevention, mitigation, and remediation strategies.
  • Licensed Geotechnical Engineers: These professionals can conduct site-specific assessments, identify potential risks, and recommend appropriate mitigation measures.

Effective Sinkhole Mitigation Strategies: Protecting Your Property and Peace of Mind

While sinkholes are a natural phenomenon, several mitigation strategies can reduce the risk and protect your property:

  • Proper Drainage: Ensuring proper drainage around your property prevents excessive water buildup, minimizing the risk of soil erosion and undermining of underground cavities.
  • Soil Compaction: Compacting the soil around your property can improve its stability, reducing the likelihood of sinkhole formation.
  • Ground Stabilization Techniques: Techniques like grouting, soil injection, and ground anchors can reinforce the soil and prevent the collapse of underground cavities.
  • Sinkhole Insurance: Consider purchasing sinkhole insurance to protect your property from financial losses in case of sinkhole damage.

Frequently Asked Questions (FAQs) about Sinkholes in Spring Hill

Q1: What are the signs of a potential sinkhole?

A: Signs of a potential sinkhole include:

  • Cracks in the foundation or walls of your home.
  • Sinking or uneven ground.
  • Doors or windows that don’t close properly.
  • Trees or other vegetation leaning or tilting.
  • Sudden changes in water drainage patterns.

Q2: What should I do if I suspect a sinkhole on my property?

A: If you suspect a sinkhole, contact a licensed geotechnical engineer or a qualified contractor to assess the situation. Do not attempt to repair the sinkhole yourself, as this could worsen the situation.

Q3: Are sinkholes a common occurrence in Spring Hill?

A: While sinkholes are a natural phenomenon in Florida, their frequency and severity can vary depending on the location and geological conditions. The Spring Hill Sinkhole Map provides valuable insights into the prevalence of sinkholes in the area.

Q4: How can I protect my property from sinkholes?

A: Implementing preventive measures like proper drainage, soil compaction, and ground stabilization techniques can significantly reduce the risk of sinkhole formation.

Q5: What are the costs associated with sinkhole repairs?

A: The cost of sinkhole repairs can vary widely depending on the size and severity of the sinkhole, the complexity of the repair, and the location of the property.

Tips for Homeowners and Property Owners in Spring Hill

  • Stay informed: Regularly check the Spring Hill Sinkhole Map for updates and consult with professionals for site-specific assessments.
  • Monitor your property: Be vigilant for signs of potential sinkholes and address any concerns promptly.
  • Maintain proper drainage: Ensure proper drainage around your property to prevent water accumulation.
  • Consider sinkhole insurance: Protect your investment by purchasing sinkhole insurance.
  • Consult professionals: Engage qualified geotechnical engineers and contractors for assessments and repairs.

Conclusion: Understanding Sinkholes and Navigating the Terrain

Spring Hill, with its diverse landscape and vibrant community, is a desirable place to live. However, understanding the geological realities of the area, particularly the presence of sinkholes, is crucial for informed decision-making. The Spring Hill Sinkhole Map serves as a valuable resource for navigating the terrain and making informed choices about property ownership and development. By staying informed, implementing preventative measures, and consulting with professionals, residents can mitigate risks and enjoy the beauty of Spring Hill while living with confidence and peace of mind.

Map Of Sinkholes In Florida  Maps Of Florida GIS Dixon Spatial Consulting: 10/4/2011 Sinkholes in Florida Florida Sinkhole Map - Know Your Area, Helicon
Florida Sinkhole Map 2023: Navigating the Landscape of Underground Hazards Large Sinkhole Swallows Street and Threatens Homes in Spring Hill Sinkholes in Spring Hill Florida?! - YouTube
Sinkhole Remediation and Repair in Florida _ Solid Foudnations Sinkhole Opens Up In Spring Hill, Florida โ€“ CBS Miami

Closure

Thus, we hope this article has provided valuable insights into Navigating the Terrain: A Guide to Understanding Sinkholes in Spring Hill, Florida. We thank you for taking the time to read this article. See you in our next article!